Braking Po!nts
Note: Braking points in this guide are set for HOTLAP only.
In this Corner Guide you’ll find all the key details for every turn on the circuit – from braking points, recommended gears, to curb usage. Each corner is broken down so you know exactly where to brake, which gear to choose, and how to use the entry, inside, and exit curbs to maximize lap time.
Use this guide as your reference to master consistency, improve pace, and get the most out of every lap.
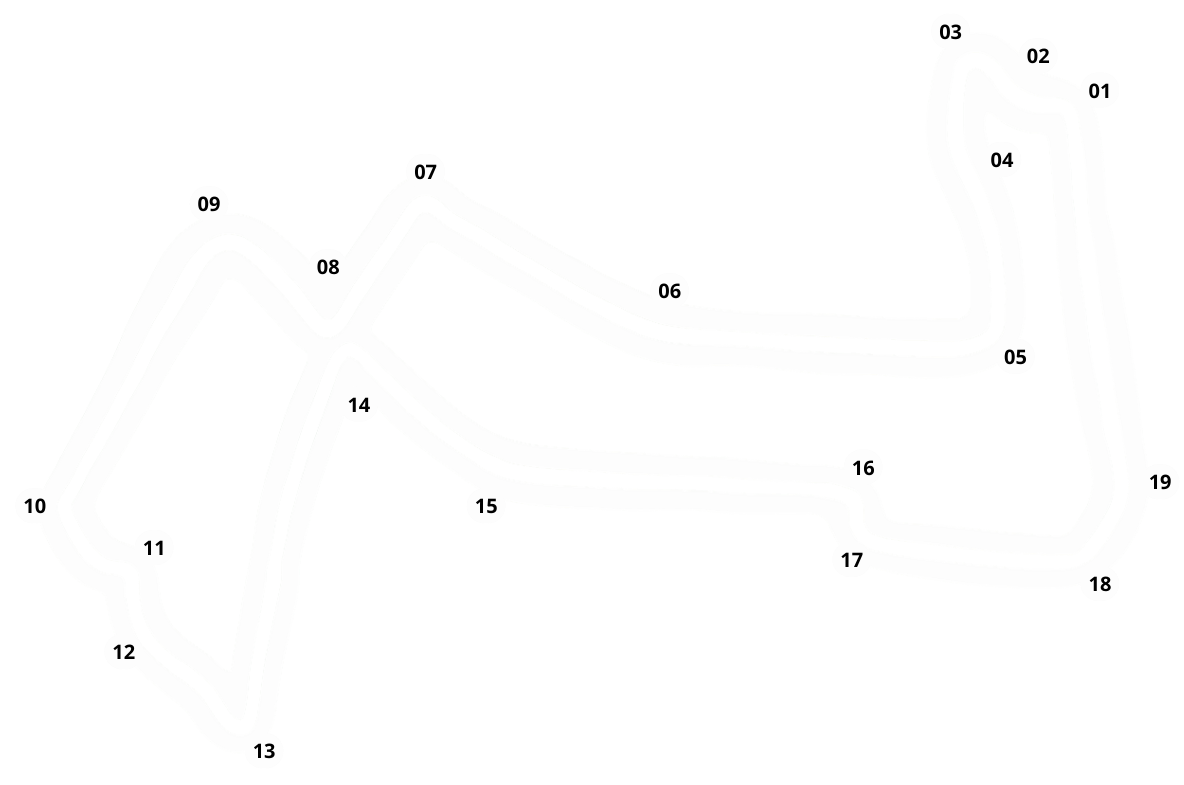
Corner
Braking point
Gear
Entry curb
Inside curb
Exit curb
01
After black board
1 car lenght
4
Attack
Attack
03
After run off curb
The orange One
3
attack
NO
05
black board
start of the curb
4
Attack
Attack
07
80m
After 100m board
4/3
Two on
Attack
08
Black board
X
3
Two on
09
Black board
X
4
Two on
10
50m board
X
4
attack
11
After close to wall
on left
3
Two on
12
Full throttle
or little lift
4
Attack
13
End of the wall
black board
3
NO
14
80-90m
After 100m board
3
Two on
Attack
16
80-90m
After 100m board
3
Two on
17
Lift
no braking
4
Two on
or NO curb
Attack
18
Full throttle
X
6
Attack
LEGEND:
Curbs:
Attack – Maximum cut to track limits
Two on – Only two tyres on the curb
NO – Do not use the curb
Empty – Curb not present or applies to previous/next corner
Attack – Maximum cut to track limits
Two on – Only two tyres on the curb
NO – Do not use the curb
Empty – Curb not present or applies to previous/next corner
Braking Point
Lift (No Braking)
Full Throttle

Setups
Here you can explore a complete collection of setups designed for every condition on track.Choose between Qualifying setups for maximum one-lap pace, Race setups for consistency and tyre management, or Wet setups to stay competitive in difficult conditions.
BrakePo+nt Setup → balanced downforce, offering a mix of speed and stability.
Safe Setup → highest downforce, best grip in corners, more stable but slower on straights.
Aggressive Setup → lowest downforce, fastest on straights, but harder to handle in corners.
If parc fermé is enabled, just skip qualifying and load the race setup straight away.
Safe Setup → highest downforce, best grip in corners, more stable but slower on straights.
Aggressive Setup → lowest downforce, fastest on straights, but harder to handle in corners.
If parc fermé is enabled, just skip qualifying and load the race setup straight away.
Quali
BrakePo+nt Setup
Aerodynamic
Transmission
Geometry
Suspension
Brakes
Tyres
Transmission
Geometry
Suspension
Brakes
Tyres
00 - 00
000 - 00
0000
0 - 0 - 0 - 0 - 0 - 0
000 - 00
10.0 - 10.0 - 10.0 - 10.0
000 - 00
0000
0 - 0 - 0 - 0 - 0 - 0
000 - 00
10.0 - 10.0 - 10.0 - 10.0
COMING SOON
Quali
Safe Setup
Aerodynamic
Transmission
Geometry
Suspension
Brakes
Tyres
Transmission
Geometry
Suspension
Brakes
Tyres
50 - 50
100 - 30
LLLL
41 - 1 - 4 - 21 - 23 - 42
100 - 54
29.5 - 29.5 - 22.0 - 22.0
100 - 30
LLLL
41 - 1 - 4 - 21 - 23 - 42
100 - 54
29.5 - 29.5 - 22.0 - 22.0
Updated: 01.09.2025
Quali
Aggressive Setup
Aerodynamic
Transmission
Geometry
Suspension
Brakes
Tyres
Transmission
Geometry
Suspension
Brakes
Tyres
44 - 42
100 - 30
LLLL
41 - 1 - 4 - 21 - 20 - 43
100 - 54
29.5 - 29.5 - 22.0 - 22.0
100 - 30
LLLL
41 - 1 - 4 - 21 - 20 - 43
100 - 54
29.5 - 29.5 - 22.0 - 22.0
Updated: 01.09.2025
Race
BrakePo+nt Setup
Aerodynamic
Transmission
Geometry
Suspension
Brakes
Tyres
Transmission
Geometry
Suspension
Brakes
Tyres
00 - 00
000 - 00
0000
0 - 0 - 0 - 0 - 0 - 0
000 - 00
10.0 - 10.0 - 10.0 - 10.0
000 - 00
0000
0 - 0 - 0 - 0 - 0 - 0
000 - 00
10.0 - 10.0 - 10.0 - 10.0
COMING SOON
Race
Safe Setup
Aerodynamic
Transmission
Geometry
Suspension
Brakes
Tyres
Transmission
Geometry
Suspension
Brakes
Tyres
50 - 46
100 - 35
LLLL
41 - 1 - 4 - 21 - 23 - 42
100 - 55-54
29.5 - 29.5 - 22.0 - 22.0
100 - 35
LLLL
41 - 1 - 4 - 21 - 23 - 42
100 - 55-54
29.5 - 29.5 - 22.0 - 22.0
Updated: 01.09.2025
Race
Aggressive Setup
Aerodynamic
Transmission
Geometry
Suspension
Brakes
Tyres
Transmission
Geometry
Suspension
Brakes
Tyres
44 - 42
100 - 35
LLLL
41 - 1 - 4 - 21 - 20 - 43
100 - 55-54
29.5 - 29.5 - 22.0 - 22.0
100 - 35
LLLL
41 - 1 - 4 - 21 - 20 - 43
100 - 55-54
29.5 - 29.5 - 22.0 - 22.0
Updated: 01.09.2025
Quali + Race
BrakePo+nt Setup
Aerodynamic
Transmission
Geometry
Suspension
Brakes
Tyres
Transmission
Geometry
Suspension
Brakes
Tyres
00 - 00
000 - 00
0000
0 - 0 - 0 - 0 - 0 - 0
000 - 00
10.0 - 10.0 - 10.0 - 10.0
000 - 00
0000
0 - 0 - 0 - 0 - 0 - 0
000 - 00
10.0 - 10.0 - 10.0 - 10.0
COMING SOON
Quali + Race
Full Wet Setup
Aerodynamic
Transmission
Geometry
Suspension
Brakes
Tyres
Transmission
Geometry
Suspension
Brakes
Tyres
50 - 50
100 - 15
LLLL
41 - 1 - 8 - 21 - 22 - 46
100 - 54-53
29.5 - 29.5 - 22.0 - 22.0
100 - 15
LLLL
41 - 1 - 8 - 21 - 22 - 46
100 - 54-53
29.5 - 29.5 - 22.0 - 22.0
Updated: 01.09.2025
Quali + Race
Wet Setup
Aerodynamic
Transmission
Geometry
Suspension
Brakes
Tyres
Transmission
Geometry
Suspension
Brakes
Tyres
50 - 50
100 - 20
LLLL
41 - 1 - 4 - 21 - 22 - 43
100 - 54-53
29.5 - 29.5 - 22.0 - 22.0
100 - 20
LLLL
41 - 1 - 4 - 21 - 22 - 43
100 - 54-53
29.5 - 29.5 - 22.0 - 22.0
Updated: 01.09.2025
Tyre info
The table shows all key details about tyres during a race.
Each compound includes its wear per lap, expected life span at 50% distance, and the ideal operating window for maximum grip and consistency.
With this information you can adjust your strategy, plan stint lengths, and make the right call on pit stops.
Each compound includes its wear per lap, expected life span at 50% distance, and the ideal operating window for maximum grip and consistency.
With this information you can adjust your strategy, plan stint lengths, and make the right call on pit stops.


Compound
C5
C4
C3
Wear per lap
7.1%
4.2%
3.4%
Life
11 laps
18 laps
23 laps
Ideal window
65 – 85°C
75 – 85°C
75 – 95°C
Tyres

Grand Prix Strategy
The Grand Prix Strategy gives you everything you need to prepare for both qualifying and the race.
You’ll find details like outlap time, fuel load, starting tyre temperatures, and the best point to activate ERS in quali. For the race, you’ll get the expected laps at half distance, recommended fuel amount, pit stop time loss, and pit limiter speed. On the right, the tyre strategy shows the fastest option, an alternative plan, and a possible two-stop strategy – including exact pit windows to help you manage tyres and race pace.
You’ll find details like outlap time, fuel load, starting tyre temperatures, and the best point to activate ERS in quali. For the race, you’ll get the expected laps at half distance, recommended fuel amount, pit stop time loss, and pit limiter speed. On the right, the tyre strategy shows the fastest option, an alternative plan, and a possible two-stop strategy – including exact pit windows to help you manage tyres and race pace.

Qualification
Time for OUTLAP:
3:00
Time for complete a one flying lap.
Quali fuel amount:
5kg
Fuel for complete a one flying lap.
Starting tyre temps:
65°C
Recommended tyre temps for hotlap.
Activate OVERTAKE mode:
Turn 19
Turn ON at this time at the start of lap.
Race
Laps (50% of the race):
31 laps
Number of laps at half of distance.
Race fuel amount:
56.7kg
How much fuel to use at 50% race.
Lost pit stop time:
21 seconds
How muich time you will lost in PITS.
Pit limiter:
60kph/37mph
Speed limiter in the PITS.
Tyre Strategy
Fastest: (One stop)
Pit Window:
Lap 14 - 15
Lap 14 - 15
Alternative: (One stop)
Pit Window:
Lap 17 - 18
Lap 17 - 18
Alternative+: (Two stop)
if SC
or VSC
or VSC

ERS Management

OVERTAKE

HOTLAP

MEDIUM
Quali Usage:
For the fastest qualifying laps, it’s important to adapt your ERS mode to each section of the track. Smart energy management ensures you extract maximum performance across a single lap. Never use HOTLAP — only on long straights after pressing OVERTAKE, but it’s usually better to just stay on OVERTAKE longer.
Race Usage:
During the race, use OVERTAKE only in short bursts on the straights, keep MEDIUM active for most of the lap, and switch to NONE through corners to recover energy efficiently.

Circuit info
The Circuit Info section provides a quick overview of the track.
It includes the lap counts for race and sprint, total circuit length, number of DRS zones, and possible overtaking spots. You’ll also find the pole position side, reference AI lap time at 110%, and key ratings such as track grip, tyre wear, downforce level, and average speed.
Use this information to understand the character of the circuit and prepare your setups and strategy accordingly.

50% race lap count
31 laps
Sprint lap count
N/A
Race lap count
62 laps

Circuit lenght
4.940 km

DRS zones
4
Overtaking zones
Turn 1, 7, 14, 16

Pole Position
Right Side

AI 110% difficulty time
1:29.936

Track grip

Tyre wear

Downforce
Average speed

Tips and tricks
Setup tips:
Aerodynamics:
High downforce is essential here – you need maximum grip for the slow, technical corners.
Transmission:
Keep the diff open on entry for rotation, then slightly more locked on exit to secure traction.
Suspension:
Soft–medium setup absorbs kerbs but stays stiff enough to keep the car sharp. A slightly raised ride height helps manage bumps and kerbs.
Brakes:
Medium pressure works best – it’s easy to lock up, so aim for a balanced setup.
Tyres:
Rear tyres overheat easily due to frequent traction zones – manage temps carefully throughout the lap.
Race tips:
Traction is everything – manage throttle carefully out of slow corners to avoid wheelspin.
Be patient in the technical sections – smooth steering and braking inputs are more effective than aggression.
Kerbs can unsettle the car, so use them sparingly and stay controlled.
Prioritise clean exits from heavy braking zones to maximise speed onto the straights.
Stay consistent through the tight middle sector, as rhythm and flow are key to lap time.
The final chicane and last sector demand precision – don’t overdrive, focus on stability to finish the lap strong.